Intro
Based on original project Car Engine Parameters Visualization,
we developed a newer version of this project in order to work with the new firmware version of Carberry.
In fact from version 1.11 of Carberry is suggested to use the ready image:
Carberry - OBD Info Panel - V2.0 - Jessie
This image is build on new linux distro, Raspbian Jessie, and uses the new format
(OBD QUERY)
to request OBD info to the car.
Differences between previous version:
- based on Raspbian Jessie distribution
- compatible with Raspberry Pi 2
- new QT version 5.4.1
- changed Carberry OBD interrogation method (OBD QUERY)
- changed gauges information: Speed, RPM, Engine Usage, Fuel Level, External Temperature (QML)
- changed carberry socket comunication (PHP)
- added exclusion system: if the system requires to car an information not available, after some failed requests the information will not more required (PHP)
How we did this
Hardware Necessary
- 1x Raspberry Pi B/2
- 1x Carberry (version related to Raspberry used)
- 1x Carberry free wire harness (CBL066UNCY11)
- 1x Carberry OBD Extender (CBL066OBUN11)
Raspberry Software Limit - QT5 Solution
The first problem in order to draw with Raspberry some gauges was the hardware acceleration, in fact at the moment with none of OS available for Raspberry is possible to get a Desktop Session Hardware Accelerated, that means that all graphic calculations that should be manage by SoC GPU are managed by SoC CPU with an higher resource usage and a worst result. A gauge that moves slowly or lagged is useless... After tons of web searches and tests:
- HTML5 render by browser in desktop
- HTML5 render by kiosk-browser
- Weston Wayland protocol, that allows a desktop accelerated but not to execute (for the moment) a browser
- ....
I found that the UNIQUE solution, for the moment, to allow to an application to use the Raspberry Hardware Acceleration was to use the QT5 programming language.
How to install QT5 on Raspberry
QT5 unfortunately is not available on Raspbian repository, and for this reason must be built manually. There are two ways to do that:
- Cross-Compile configuration: that means use an x86 PC to compile QT5 directly for Raspberry ARM Soc, that's the fastest (just 5-6 hours) solution but, in my opinion, the more complex. Here a guide to do that: https://qt-project.org/wiki/RaspberryPi_Beginners_guide
-
Native Build:
that means use the Raspberry CPU to compile all QT5 source code. That was the solution I used. Here the guide followed by me:
http://wiki.qt.io/Native_Build_of_Qt_5.4.1_on_a_Raspberry_Pi
Pay attention because this process will take at least 9 hours with a Raspberry Pi3.
Remember that Raspbian must be modified in order to work with Carberry, you could do that following this guide: http://www.carberry.it/wiki/carberry:rpi:linux:distrib:raspbian_yourself
How to draw Gauges - QML
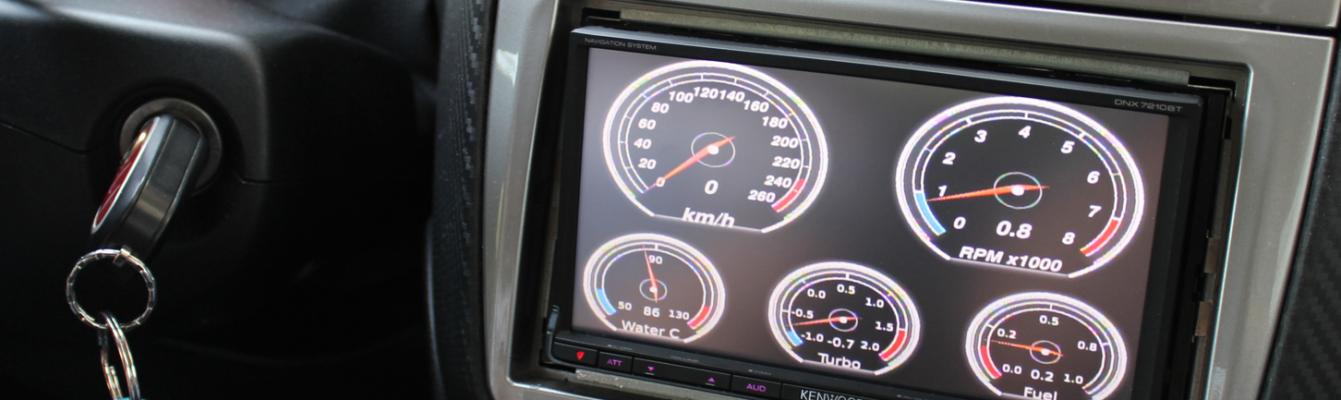
After 9 hours we have our Raspberry with QT5 successfully installed and we are ready to create our QT5 application. Now I don't know nothing about QT programming language, I'm a web designer and I know "only": HTML, CSS3, JavaScript, PHP and use a programming language like QT5 that's very similar to C++ it's not so easy. For this reason I decided to use just QML (Qt Meta Language) that has a syntax very close to JavaScript and allows to create simple Graphic UI. To create some gauges I used a ready online project: https://github.com/lemirep/QtQuickCarGauges But some modifications were necessary because the source code renders a canvas bar each time that the needle moves up or down, this feature reduces dramatically the Raspberry performance. So I decided to comment all the parts of the source code related to this canvas render, you could find my ready Project at bottom of this Paragraph. Carberry OBD Info Panel Project draws 5 gauges:
- Speed
- RPM
- Air Temp
- Fuel Level
- Engine Usage
Carberry OBD Info Panel Project Download: Carberry - OBD Info Panel - QT Project - v2.0
How to update gauge value
In order to update the gauge value we need to communicate with the Carberry Socket. I'm not able to communicate with the Carberry Socket directly through QT5 so I used the possibility of QML to integrate also JavaScript in order to execute Ajax calls to a PHP script, written by me, that communicates with the socket and returns a JSON output. To run PHP I installed NGINX + PHP-FPM that reduces at minimum the use of CPU.

In the main.qml file we can find 2 javascript functions:
function update_speed_rpm_usage() {
  call_1_status = "false";
  var action = "update_speed_rpm_usage";
  var doc = new XMLHttpRequest();
  var params = "action="+ action +"&method=json";
  doc.onreadystatechange = function() {
    if (doc.readyState === XMLHttpRequest.DONE)
	{
	  call_1_status = "true";
	  //console.log("chiamata 1 completata");
	  var obj = JSON.parse(doc.responseText);
	  if(obj.speed != undefined && obj.rpm != undefined && obj.engine_usage != undefined)
	  {
		speed_value = obj.speed;
		rpm_value = parseFloat(obj.rpm);
		usage_value = obj.engine_usage;
	  }

	  if(obj.error != '')
	  {
		error_text = obj.error;
		show_error = true;
	  }
	  else
	  {
		show_error = false;
	  }
	}
  }
  doc.open("post", url, true);
  doc.setRequestHeader("Content-type", "application/x-www-form-urlencoded");
  doc.setRequestHeader("Content-Encoding", "UTF-8");
  doc.setRequestHeader("Content-length", params.length);
  doc.setRequestHeader("Connection", "close");
  doc.send(params);
}

function update_air_fuel() {
  call_2_status = "false";
  var action = "update_air_fuel";
  var doc = new XMLHttpRequest();
  var params = "action="+ action +"&method=json";
  doc.onreadystatechange = function() {
	if (doc.readyState === XMLHttpRequest.DONE)
	{
	  call_2_status = "true";
	  //console.log("chiamata 2 completata");
	  var obj = JSON.parse(doc.responseText);
	  if(obj.fuel_level != undefined && obj.air_temp != undefined)
	  {
		fuel_value = parseFloat(obj.fuel_level);
		air_value = parseFloat(obj.air_temp);
	  }

	  if(obj.error != '')
	  {
	    error_text = obj.error;
		show_error = true;
	  }
	  else
	  {
		show_error = false;
	  }
	}
  }
  doc.open("post", url, true);
  doc.setRequestHeader("Content-type", "application/x-www-form-urlencoded");
  doc.setRequestHeader("Content-Encoding", "UTF-8");
  doc.setRequestHeader("Content-length", params.length);
  doc.setRequestHeader("Connection", "close");
  doc.send(params);
}
Called by 2 timers that work at different speed:
Timer
{
  interval: 100
  repeat: true
  running: true
  onTriggered:
  {
	if(parent.call_1_status == "true")
	{
	  parent.update_speed_rpm_usage();
	}
  }
}
The first timer calls the function update_speed_rpm_usage() every 100ms because these information must be updated as fast as possible.
The function calls a PHP called ajax_commands.php that returns a JSON output with the value of SPEED and RPM.
Timer
{
  interval: 5000
  repeat: true
  running: true
  onTriggered:
  {
	if(parent.call_2_status == "true")
	{
	  parent.update_air_fuel();
	}
  }
}
The second timer calls the function update_air_fuel() every 5 seconds because are information that don’t require a fast update.
The function calls a PHP called ajax_commands.php that returns a JSON output with the value of AIR TEMPERATURE and FUEL LEVEL.
How the socket communication works
As previously said the communication between QML and the socket is managed by PHP, that opens a connection to 127.0.0.1 at the port 7070
where the Carberry daemon runs, sends the right command, as described in the wiki
http://www.carberry.it/wiki/carberry:cmds:subsys:obd:query_new,
read the value, return the value in JSON format.
How to setup Carberry in order to communicate with the car
The new way to communicate with OBD ports is a bit more tricky but is more complete and allows any kind of communication with car OBD port.
Steps necessary:
-
Set carberry canbus management in "user mode"
http://www.carberry.it/wiki/carberry:cmds:subsys:canbus:mode -
Set Carberry canbus channel CH1|CH2 and speed 500K|250K|125K|100K|95K2|83K3|50K|33K3|AUTO
http://www.carberry.it/wiki/carberry:cmds:subsys:canbus:user:open -
Set canbus frame alignment
http://www.carberry.it/wiki/carberry:cmds:subsys:canbus:user:align -
Set Transmission ID and Reception ID: according to
SAE-J2284protocol is necessary to set which device to interrogate setting packet header and where the reply will be received setting reception header
http://www.carberry.it/wiki/carberry:cmds:subsys:obd:query_new:set_txid
http://www.carberry.it/wiki/carberry:cmds:subsys:obd:query_new:set_rxid -
Ask required information to the car
http://www.carberry.it/wiki/carberry:cmds:subsys:obd:query_new:query
Canbus 11bit working example
- CAN MODE USER
- CAN USER OPEN CH1 500K
- CAN USER ALIGN RIGHT
- OBD SET TXID CH1 07E0
- OBD SET RXID CH1 07E8
- OBD QUERY CH1 010D --> This is speed information PID list is available at this link: https://en.wikipedia.org/wiki/OBD-II_PIDs#Standard_PIDs
Canbus 29bit working example
- CAN MODE USER
- CAN USER OPEN CH1 500K
- CAN USER ALIGN RIGHT
- OBD SET TXID CH1 C6C0:CCFC40
- OBD SET RXID CH1 C6C0:BC4400
- OBD QUERY CH1 010D --> This is speed information
PID list is available at this link: https://en.wikipedia.org/wiki/OBD-II_PIDs#Standard_PIDs
The PHP script is available here: Carberry - OBD Info Panel - PHP Script - v2.0
Compile and Run
To run the QML application we need just to copy the project folder to /home/pi
Enter in the directory
cd /home/pi/Carberry_InfoPanel
Run QMAKE
qmake
Build the application
make
To run the application
./Carberry_InfoPanel
To run the application on boot we need to edit the /etc/rc.local file
sudo nano /etc/rc.local
Add before exit 0
/home/pi/Carberry_InfoPanel/Carberry_InfoPanel
The PHP script must be placed in the Webserver Document Root (by default) is /var/www/html
OBD Connections
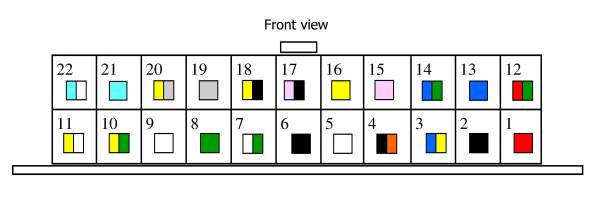
Carberry Pinout
OBD Pinout
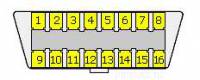
| Carberry Pin | Wire Colour | OBD Port Pin | Description |
|---|---|---|---|
| 1 | Red | 16 | +12V |
| 2 | Black | 5 | Ground |
| 3 | Yellow/Blue | TO POSITIVE IGNITION | Positive Ignition |
| 8 | Green | 6 | Can H |
| 9 | White | 14 | Can L |
The OBD connections can be found at this link: http://www.carberry.it/wiki/carberry:hardware:parallel_connection
Downloads
- Carberry OBD Info Panel Ready Image (8GB SD required): Carberry - OBD Info Panel - V2.0
- Carberry OBD Info Panel QT Project: Carberry - OBD Info Panel - QT Project - v2.0
- Carberry OBD Info Panel PHP Script: Carberry - OBD Info Panel - PHP Script - v2.0